Example XJEase Code
A full range of XJEase device files which match thousands of part numbers is available in the XJEase library that is installed as part of XJTAG.
XJEase is an easy-to-learn programming language and from XJDeveloper you can view or even edit the device models in your project, to customise them or to create files for new devices.
Below is an example of some simple XJEase.
In XJDeveloper the Test Device Files screen is used to view or edit the XJEase code for devices.
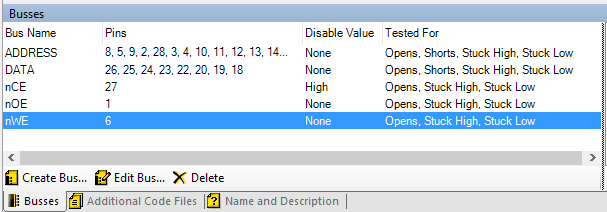
A memory device might be defined as in the screenshot below to have several busses.
Some busses (like nWE) are a single pin, whereas the address and data busses contain many pins. The pins are simply the pin numbers on the device type that is being tested, obtained from the datasheet. The file is therefore “device-centric” – it refers to a specific type of device, but not to the circuit that the device is placed in, which means the file can be re-used whenever the device is used in another project.

Using these busses, a memory device will then typically have short functions which can write or read a word to/from the memory.
For example:
// Write a byte of data to the address specified
WriteCycle( INT address, INT data )()
  SET ADDRESS := address[10..0], DATA := data[7..0], nCS := 0, nWE := 0;
  SET nCS := 1, nWE := 1;
END;

// Read from the address specified and return the byte read in the data parameter
ReadCycle( INT address )( INT data )
  SET ADDRESS := address[10..0], DATA := I, nOE := 0, nCS := 0;
      // This will set the data bits to input.
  SET nCS := 1, nOE := 1, data := DATA;
  FLUSH;
END;
It may then have other functions – for example one to test the data bus.
This example does not reflect how XJTAG library tests work but this sets a simple walking 1s pattern to the device. If all goes as expected the function returns 0 in the “result” parameter, but if something goes wrong it returns 1 to indicate an error, and prints a message.
TestData( )( INT result )

  INT dataLine, value, testValue;

  result := 0;

  // Walking '1's
  FOR dataLine := 0 TO 7
    testValue := 1 << dataLine;
    WriteCycle( dataLine, testValue );
  END;

  FOR dataLine := 0 TO 7
    testValue := 1 << dataLine;
    ReadCycle( dataLine )( value );
    IF debug THEN
      PRINT("Wrote 0x", HEX(testValue), " to address ", dataLine," read back 0x", HEX(value), "\n");
    END;

    IF value != testValue THEN
      result := 1;
      PRINT("Error found while testing Data line ", dataLine, ".\n");
    END;
  END;

END;
